The Case for Preventive Washing Machine Maintenance
A washing machine is one of the most heavily used appliances in any household. In a typical Japanese home, a machine runs 5–7 cycles per week, which adds up to over 300 cycles per year. Each cycle subjects the drum, seals, bearings, pump, and electronic controls to repeated mechanical and thermal stress.
Preventive maintenance is not simply about keeping the machine clean — though that matters enormously for hygiene and wash quality. It is about identifying and addressing the gradual wear patterns that, if left unchecked, turn inexpensive maintenance tasks into expensive repairs or premature machine replacement. This guide covers every aspect of washing machine care in the order that matters, from the most frequently needed tasks to the seasonal deep-clean procedures.
Part 1: Drum Care
Monthly Drum Clean Cycle
Washing machine drums accumulate biofilm — a layer of bacteria, detergent residue, and fabric fibres — that builds up over time on the stainless steel interior surface and in the spaces behind the drum paddles. This biofilm is responsible for the musty odour that many machines develop, and it can transfer onto clean laundry if left unaddressed.
Most modern washing machines have a dedicated Drum Clean or Tub Clean cycle, typically running at 60°C or higher for an extended duration. Run this cycle monthly with the drum completely empty. You can add a small amount of white vinegar (100–150ml) poured directly into the drum before starting the cycle — this helps dissolve limescale and biofilm simultaneously. Do not add detergent during a drum clean cycle.
If your machine does not have a dedicated drum clean programme, select the hottest wash (typically Cotton 90°C) and run it empty. Check your machine's manual first to confirm that running an empty hot cycle is permitted — on some machines, a minimum load weight is required to protect the drum bearing during high-speed spin.
Cleaning the Drum Interior
After running a drum clean cycle, open the door and wipe down the drum interior with a clean damp cloth. Pay particular attention to the three drum paddles (also called lifters or baffles) — these are the raised fins inside the drum that tumble the laundry. There are small holes at the base of each paddle that can harbour accumulations of lint and detergent. Use a soft brush or old toothbrush to clean around and under these paddle bases.
Also clean around the rim where the drum meets the front seal — this gap collects lint, hair, and debris that falls off clothing before it enters the main drum area. This accumulation can harbour bacteria and contribute to odour even after a drum clean cycle.
Part 2: Door Seal (Gasket) Care
Understanding Why Seals Fail
The rubber door seal (gasket) on a front-loading washing machine is one of the most maintenance-sensitive components on the entire appliance. It sits in a permanently damp environment, creates multiple trapped water pockets in its folded profile, and is subjected to repeated flexing and compression every time the door is opened and closed. Without regular care, mould colonies establish themselves in the fold of the seal within weeks.
Weekly Seal Wipe-Down
After the final wash cycle of the day, fold the seal back gently to expose the inner profile and wipe it thoroughly with a dry cloth. Remove any visible debris — hair, lint, small objects — from the fold. Leave the machine door slightly ajar after every wash to allow airflow through the drum and seal area. This single habit eliminates the conditions that allow mould to grow.
Monthly Deep Seal Cleaning
Once a month, fold the seal back as far as it will go and clean the entire inner surface with a cloth dampened with a diluted white vinegar solution (1 part vinegar to 3 parts water). Work around the full circumference of the seal, paying particular attention to the bottom where water tends to pool. After cleaning, wipe dry with a clean cloth and leave the door open for several hours.
Mould Warning
If you find established black mould on the door seal, do not use bleach directly on the rubber — repeated bleach exposure degrades rubber and will cause the seal to crack and split prematurely. Use a dedicated mould remover appropriate for rubber, or consult our contact page for specific product recommendations for Japan.
Part 3: Filter Reinstallation After Cleaning
Filter Reinstallation
Correctly Reinstalling the Pump Filter
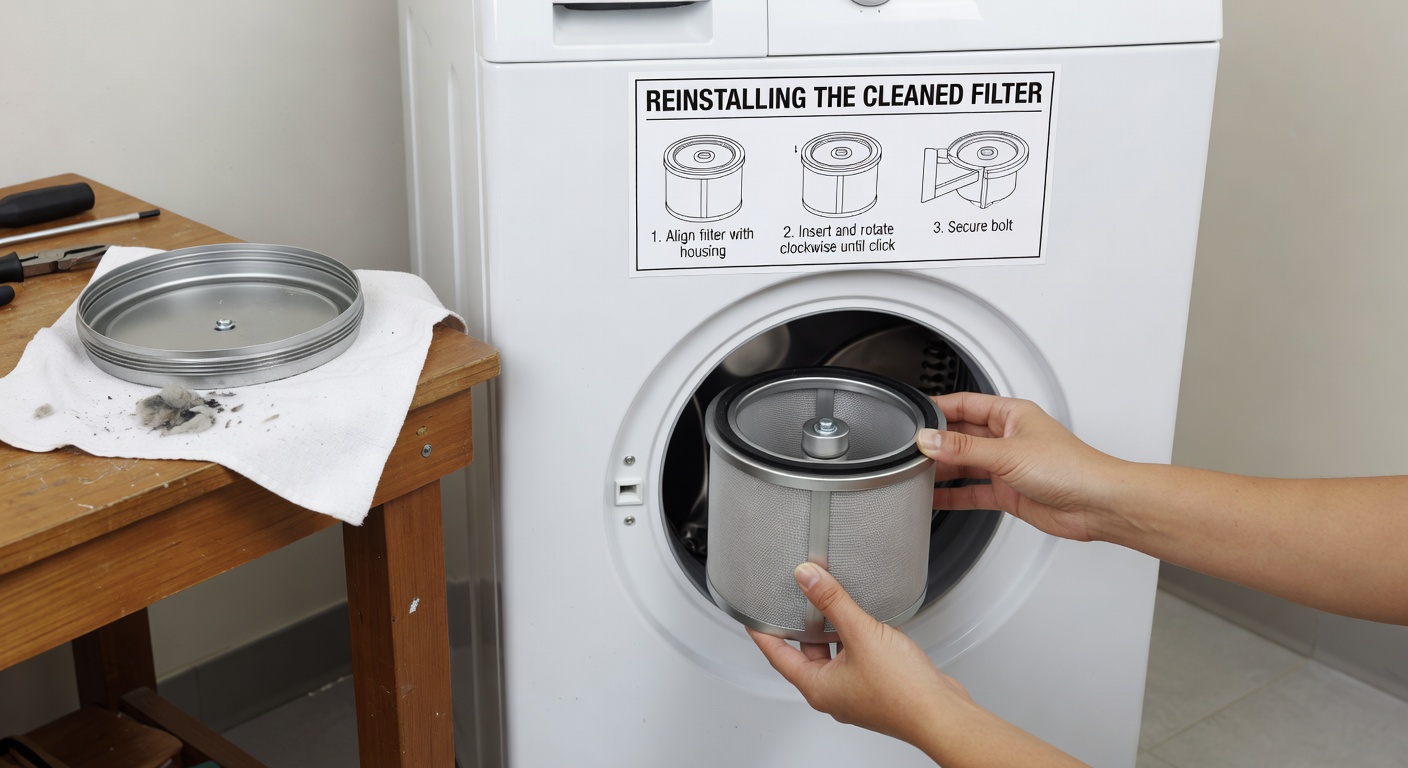
After cleaning the pump filter (full process covered in our dedicated filter cleaning guide), reinstallation must be done carefully to prevent leaks.
Check the O-ring before reinstalling: The rubber O-ring seal must sit perfectly in its groove without any twisting. Run your fingertip around the ring confirming it is evenly seated. Even a small section of twisted O-ring will create a leak path that allows water to drip continuously onto the floor during wash cycles.
Insert and hand-tighten: Insert the clean filter into the housing with the arrow (if present) aligned correctly. Turn clockwise by hand until you feel resistance — typically 2–3 full turns. Do not use a tool to tighten. The filter should be firm and show no movement when you try to pull or turn it, but it should not require significant force to tighten.
Close the drain hose cap (if your machine has a separate pre-drain hose) and press it back into its clip. Close the access panel and run a brief test cycle while watching for leaks around the filter area.
Part 4: Load Balancing and Preventing Drum Damage
Load Balancing
How to Load Your Machine for Balanced Washing
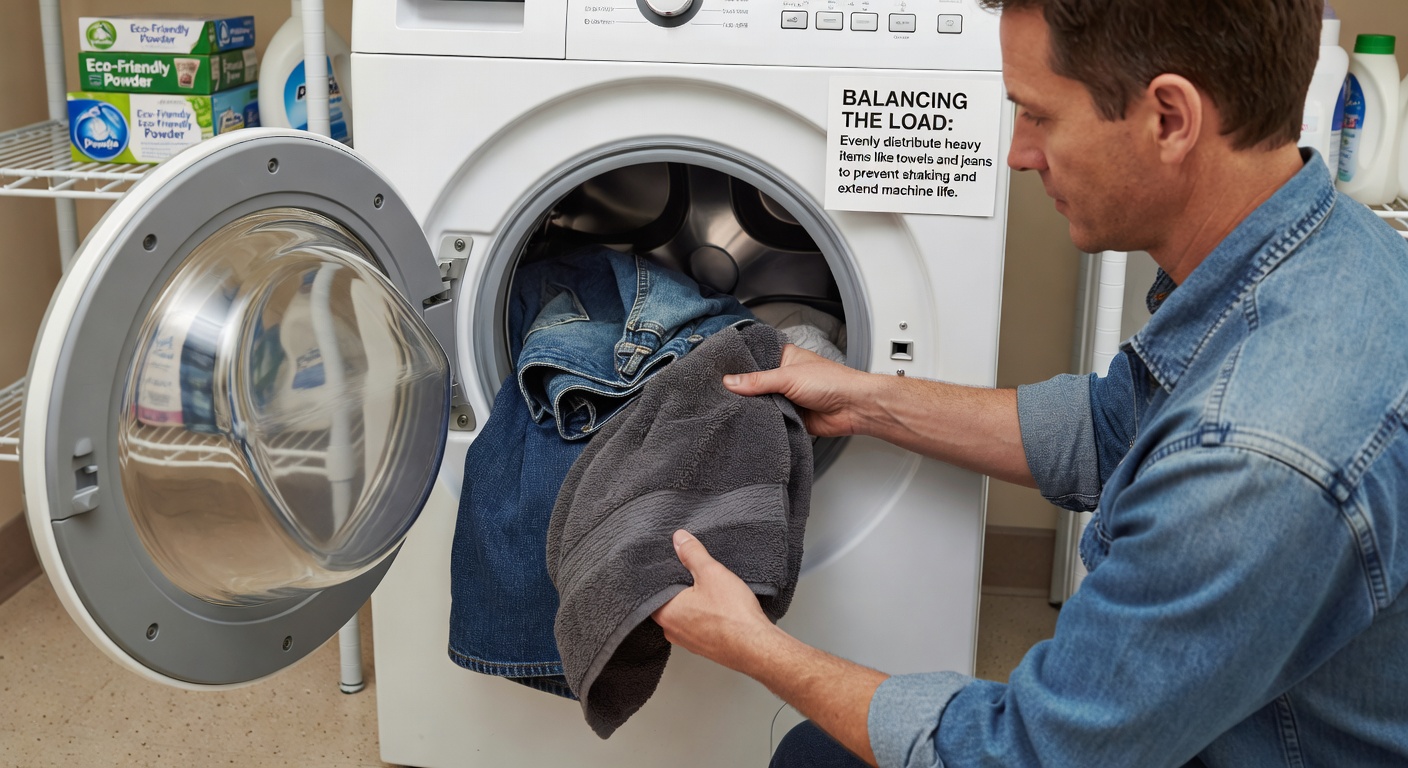
Improper loading is one of the most common causes of excessive vibration, noise, and premature bearing wear in washing machines. A machine that vibrates significantly during spin is not just annoying — it is actively damaging its own suspension components, drum bearings, and in severe cases, its outer tub.
The fundamental rule: Distribute items evenly around the drum. Heavy items (jeans, towels, bedding) should be placed alternately around the drum circumference, not piled together on one side. For a mixed load, alternate heavy and light items as you load them in — this creates a roughly balanced distribution before the cycle even begins.
Never wash a single heavy item alone: A single duvet, jeans, or large towel will inevitably travel to one side of the drum during the spin cycle, creating an extreme imbalance that forces the machine to repeatedly interrupt and redistribute the load — or, if the imbalance is severe enough, stop entirely with an error code. Always pair heavy single items with one or two similar-weight companions to create a self-balancing combination.
Optimal drum fill level: For best wash quality and balance, fill the drum to approximately 75–80% capacity. A grossly underfilled drum concentrates items on one side; an overfilled drum restricts item movement and prevents proper rinsing. Items should move freely when you rotate the drum by hand before closing the door.
Check machine levelling: A machine that is not sitting perfectly level on all four feet will vibrate more during spin regardless of how well the load is balanced. Place a spirit level on top of the machine and adjust the levelling feet (usually threaded and adjustable by hand) until the machine is level side-to-side and front-to-back. Lock each foot in position with its locking nut.
Pro Tip — The Spin Cycle Test
If your machine vibrates excessively during the spin cycle, pause it mid-cycle, open the door carefully, and manually redistribute the items evenly around the drum. Restart the spin. If this resolves the vibration, your loading technique is the issue. If vibration continues with a balanced load, check the machine's levelling feet.
Part 5: Detergent Dispenser Drawer Maintenance
The detergent dispenser drawer accumulates a combination of undissolved detergent, fabric softener residue, limescale, and mould spores over time. A partially blocked dispenser means detergent is not being fully dispensed into the drum, resulting in poor wash quality. Many machines allow the drawer to be removed entirely for cleaning — consult your manual.
Remove and rinse the drawer under warm running water monthly. Use a small brush to clean between the dispenser compartment dividers and inside the drawer housing in the machine. On machines where the drawer cannot be removed, wipe it out with a damp cloth and run a rinse cycle to flush the dispenser system.
Washing Machine Maintenance Schedule
| Task | Frequency | Method |
|---|---|---|
| Wipe door seal and drum rim | After last cycle each day | Dry cloth; leave door ajar |
| Clean dispenser drawer | Monthly | Warm water; small brush |
| Run drum clean cycle | Monthly | Empty drum; 60°C+; optional vinegar |
| Deep clean door seal | Monthly | Diluted white vinegar; dry cloth |
| Clean pump filter | Every 2–3 months | See filter cleaning guide |
| Check machine levelling | Every 6 months | Spirit level; adjust feet |
| Inspect water inlet hoses | Every 6 months | Check for bulges, cracks, corrosion |
| Check drain hose connection | Annually | Confirm secure; no kinks or cracks |
| Inspect door seal for damage | Annually | Look for cracks, tears, deformation |
Related Articles
Advertising supports our free editorial guides.