Why Filter Maintenance is Essential
The filter is the heart of your vacuum cleaner's cleaning system. It is responsible for trapping fine dust, allergens, pet dander, pollen, and microscopic particles that would otherwise be blown back into your room through the exhaust air. A clean filter means clean air leaving the vacuum; a clogged filter means restricted airflow, reduced suction, and potentially harmful particles being redistributed around your home.
Modern vacuum cleaners — particularly those marketed for allergy sufferers — often use multiple filter stages. A pre-motor filter protects the motor from large debris, while a post-motor HEPA filter catches the finest particles before air exits the machine. If either filter becomes blocked, the entire airflow pathway suffers. Understanding your specific filter setup is the foundation of effective vacuum maintenance.
In this guide, we cover every common filter type, how to clean each one correctly, and the definitive answer to the question that confuses most vacuum owners: when should you wash versus when should you replace?
Understanding Your Filter Type
Foam Filters
Foam filters are typically the pre-motor filter found in bagless cylinder and upright vacuums. They are usually a pale grey or blue sponge-like material housed in a circular or rectangular frame above the dust bin. Foam filters are washable and generally very durable. They should be washed monthly under regular use and replaced every 12–18 months or when they begin to show signs of permanent discolouration, crumbling, or distortion.
Pleated Paper or Synthetic Filters
Pleated filters increase the surface area available for filtration without increasing the physical size of the filter housing. They can be made from paper, polyester, or a combination. Paper pleated filters should never be washed — moisture causes the paper to swell, warp, and lose its structural integrity. Synthetic pleated filters are often washable, but always check your manual. Both types should be tapped clean monthly and replaced every 3–6 months depending on usage.
HEPA Filters
High-Efficiency Particulate Air filters are the gold standard of vacuum filtration, capable of trapping 99.97% of particles 0.3 microns or larger. They are mandatory in vacuums certified for allergy and asthma sufferers. Some HEPA filters are washable, but many are not — a washed non-washable HEPA filter will have its microscopic fibre structure permanently damaged, rendering it ineffective even if it looks clean. Always check the filter label or manufacturer documentation before washing. Replace non-washable HEPA filters every 6–12 months.
Cartridge Filters
Common in workshop-style and heavy-duty vacuums, cartridge filters are cylindrical pleated elements that can usually be tapped clean and occasionally washed. They are designed for environments with larger debris loads and are typically the most robust filter type in terms of longevity, lasting 1–2 years with regular maintenance.
Step-by-Step Filter Cleaning Process
Step 1
Locate and Remove All Filters
Before you begin, consult your vacuum's user manual or the manufacturer's website to identify the exact number and location of all filters in your model. Having a diagram in front of you prevents the common mistake of reassembling the vacuum without having cleaned every filter.
Turn off and unplug the vacuum. Remove the dust bin and set it aside. Filters are typically found in the following locations: (1) a circular foam filter sitting directly above where the bin was, (2) a pleated filter inside the bin lid or in a separate chamber, and (3) a HEPA or exhaust filter at the rear or underside of the machine. Remove each filter carefully, noting its orientation.
Step 2
Tap Away Loose Dust — Outdoors if Possible
Take each filter outside (or hold it over a waste bin) and tap it firmly against the palm of your other hand, or against the inside of the bin, to dislodge loose accumulated dust. You will be surprised how much comes out even from a filter that appeared clean.
Do not use compressed air to blow through a filter from the clean side — this can drive particles deeper into the filter medium and damage the fibre structure of HEPA filters. If you use compressed air, always blow from the dirty side through to the clean side.
Step 3
Wash Washable Filters Under Cold Water
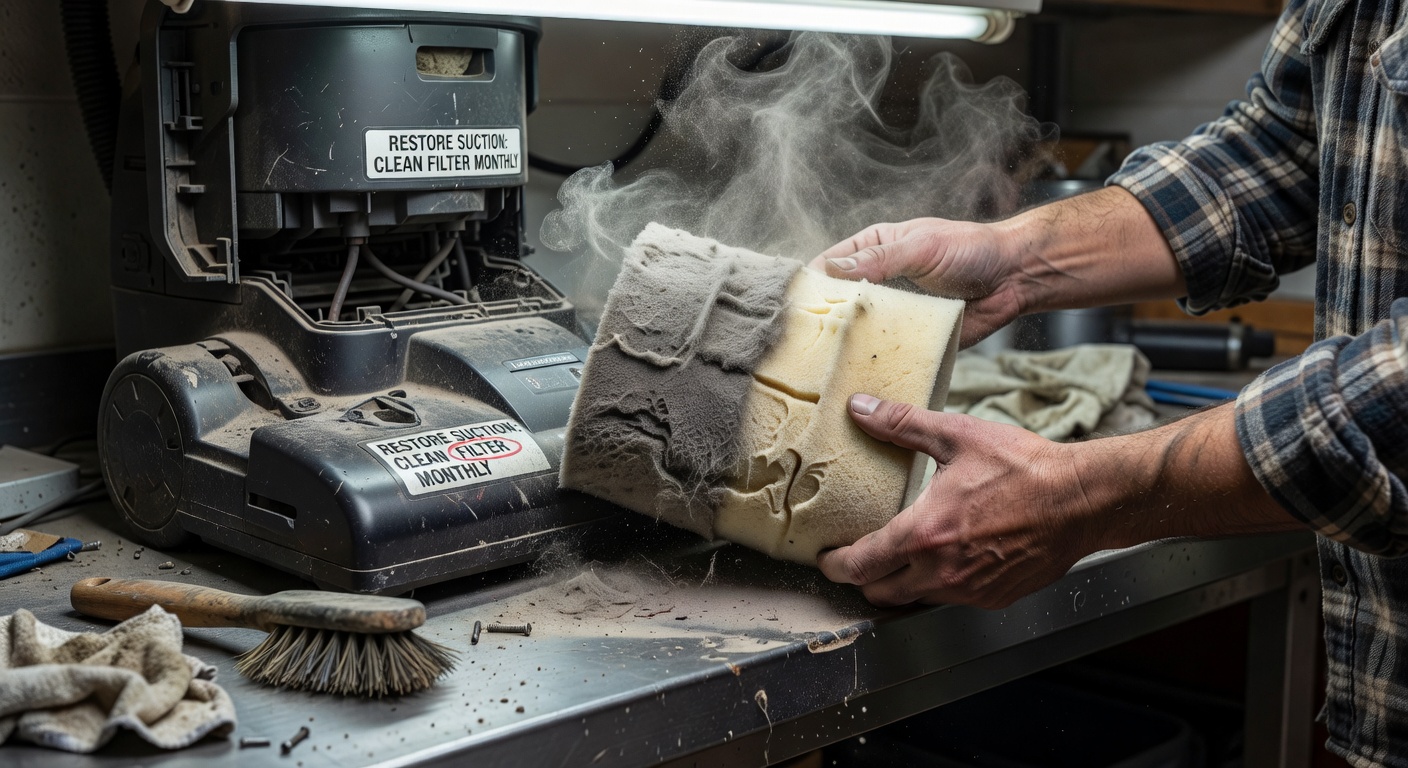
For filters confirmed as washable by the manufacturer, hold the filter under cold running water and gently squeeze (for foam) or rinse (for pleated) until the water running off the filter is clear. Use cold water only — hot water can shrink or distort foam and synthetic filter materials.
Do not use dish soap, detergent, or any cleaning agent unless the manufacturer explicitly states it is safe to do so. Most filter materials are designed to be cleaned with water alone; detergents can leave a surfactant residue that changes the filter's static charge properties and reduces filtration efficiency.
After rinsing, gently press foam filters between two dry towels to remove excess water. Do not wring or twist — this permanently compresses the foam structure.
Step 4
Allow Filters to Dry for 24 Hours Minimum
This step is non-negotiable. Reinserting a damp filter is one of the most common and damaging mistakes vacuum owners make. A wet filter restricts airflow almost as severely as a completely blocked one. Worse, it creates a damp environment within the vacuum body that encourages mould and mildew growth — leading to musty odours that are extremely difficult to eliminate later.
Place washed filters on a clean dry surface in a warm, well-ventilated area. Do not place them in direct sunlight or near a heat source — UV radiation and heat can degrade filter materials. In most Japanese homes, placing them near an open window or ventilation fan for 24 hours is sufficient. In humid summer months, allow 36–48 hours.
Test for dryness by pressing the filter firmly between dry white paper towels — if any moisture transfers, it is not ready yet.
Step 5
Reinstall Filters in the Correct Orientation
Once dry, reinsert each filter in the exact orientation you noted during removal. Foam filters typically have a specific top and bottom (often indicated by an arrow or ridge). Pleated filters often have a directional seal. Installing a filter backwards or upside down reduces its effectiveness and can allow debris to bypass it entirely.
Press each filter firmly into its housing — there should be no visible gaps around the edges. If your vacuum uses rubber gaskets to seal filter housings, inspect these for cracks or flattening and replace them if damaged.
Warning
Never use a vacuum with a wet filter. The moisture will reduce suction, potentially damage the motor bearings, and create conditions for mould growth inside the vacuum body. Always wait the full 24 hours.
Bag Replacement: The Complete Guide
Bag Care
Knowing When and How to Replace Your Vacuum Bag
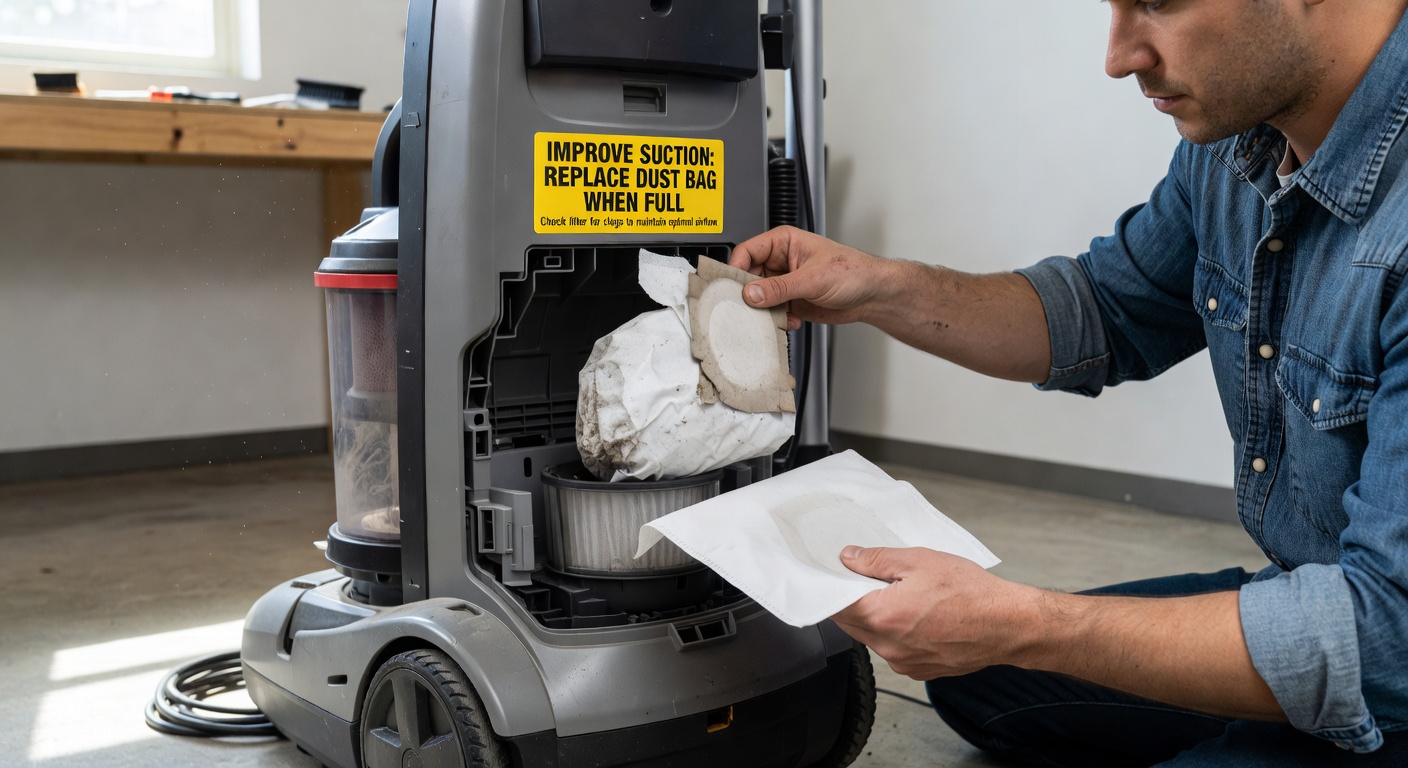
Vacuum bags are not just a debris collection vessel — they are also a filtration layer. The woven fabric of a quality vacuum bag filters a significant portion of fine particles before air reaches the motor filter. This is why bag quality matters: a cheap generic bag that allows dust to pass through will dramatically reduce the lifespan of your motor filter.
When to replace: Replace the bag when it reaches approximately 50–60% full by weight, not by visual appearance. A bag can appear to have plenty of visible space remaining while the fabric is already saturated with fine particles and restricting airflow. If you notice any reduction in suction, checking the bag fill level is always the first step.
How to replace without mess: Before opening the bag compartment, place a large rubbish bag on the floor and work over it. Most modern bags have a self-sealing collar — when you pull the bag from its mounting plate, a cardboard or plastic disc slides across the opening automatically. If your bag does not have this feature, fold the open end over twice and hold it closed as you lift the bag out.
Hygienic disposal: Place the removed bag directly into a sealed bin liner and dispose of it immediately. Do not carry it through the house — the vibration of walking will cause the bag to release fine particles through the fabric.
Choosing the right bag: Always use bags specified for your exact vacuum model. The shape, volume, and mounting collar design vary between manufacturers and even between different product lines from the same manufacturer. Aftermarket bags that claim universal compatibility often provide a poor seal at the mounting point, allowing unfiltered air to bypass the bag entirely.
Maintenance Schedule
| Task | Frequency | Notes |
|---|---|---|
| Empty dust bin / check bag fill | Before every use | Start each session with an empty bin for peak performance |
| Tap filters clean | Monthly | Outdoors; gently against palm of hand |
| Wash washable filters | Every 3 months | Cold water only; allow 24h to dry fully |
| Replace vacuum bag | When 50–60% full | Use genuine manufacturer bags only |
| Replace non-washable HEPA filter | Every 6–12 months | More often in high-use or pet households |
| Replace washable foam filter | Every 12–18 months | Even if it still looks acceptable after washing |
| Cut hair from brush roll | Every 4–6 weeks | More often with long hair or pets |
| Full inspection (hose, wand, seals) | Every 6 months | Check for cracks, loose joints, worn gaskets |
Pro Tip
Keep a spare set of replacement filters on hand. When you wash your current filters, install the spare set so the vacuum can be used immediately. This eliminates the temptation to reinstall damp filters before they have fully dried.
Related Articles
Advertising supports our free editorial guides.